Page History: Installing
Compare Page Revisions
Page Revision: Friday, 19 February 2010 10:40
Downloading the software
Once you have your hardware in place and setup correctly you are ready to download your
Solo software. To do this simply go to http://download.bionics.co.uk and log on using the details you were provided with following your purchase and you will be able to download your PhoneBOX Solo software.
Starting Solo for the first time
Now you have downloaded your software, to start Solo, simply click on the start menu icon as you would to start any other application.
The Solo software will load and, if Solo has not already been licensed, will prompt you to request a license. Click the 'Request/Download' button, enter your details to submit a license request. Following this Solo will close. Until a license has been issue it is not possible to start Solo.
Once a license has been issued, you will receive an email from support@bionics.co.uk informing you that your licence request has been approved. Upon receipt of this email you will now be able to Solo as a licensed user. Simply open Solo again and the license will be downloaded automatically.
Audio Settings
You will be prompted to set up your audio settings using the following dialogue box.
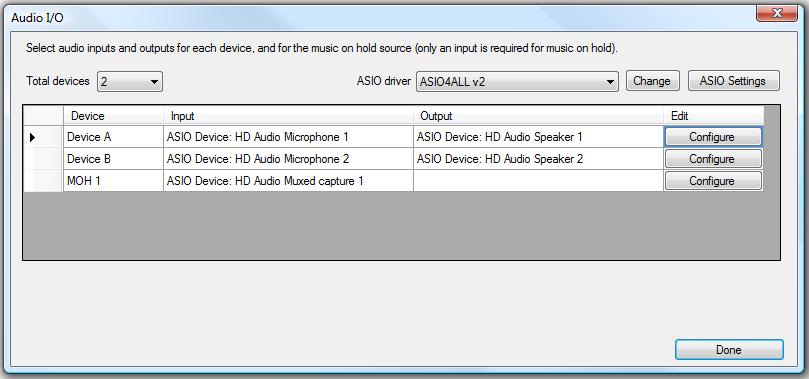
ASIO
If you wish to use ASIO devices, select an ASIO driver from the drop down list and select 'change'. To configure a selected ASIO driver, select 'ASIO settings'. This will show the selected ASIO drivers own configuration dialog. Any changes made here may require Solo to be restarted before they take effect.
Click 'Configure' for each device and you will be presented with the following to make you selections.
Configure inputs/outputs
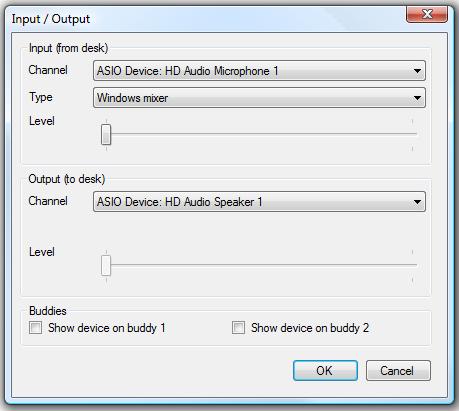
Select your input and output channel devices from the drop down boxes and click OK. Simply repeat this process for each device and for your Music on Hold (MOH). Your MOH will only require and input channel. Should you need to edit these at a later date you can find the 'Audio Settings' dialogue box in the Tools > Admin menu Once completed click OK and you will be prompted to set up your SIP settings.
If the device should be controllable from a buddy, select 'Show device on buddy X'.
SIP Providers
Each 'provider' represents a set of lines either on a SIP gateway or SIP provider.
You can add as many 'providers' as required but are limited to a maximum total number of lines by your license.
If no providers are configured you will be prompted to set at least one up before using Solo. To make changes later go to Tools->Admin->SIP Providers
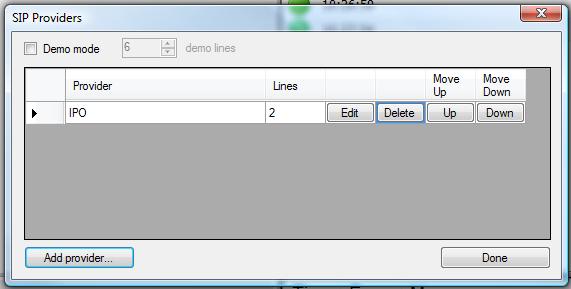
The SIP Providers dialog allows you to add and remove providers. To add a provider click the add provider button and follow the prompts on screen. Use the up and down buttons to change the order providers are displayed on the lines.
It is also possible to active 'demo' mode which simulates a SIP provider for testing and demonstration purposes. Ensure demo mode is not selected when you are ready to use Solo with real providers!
SIP settings
Display
- Lines - The number of lines available on the gateway/with the provider. This will directly control how many calls can be made and received in Solo from the provider.
- Dial priority - When clicking the dial button in Solo a provider is chosen to dial on using the dial priority. Providers with a lower number will be tried in turn until a provider is found with spare lines.
- Line label - The line label will be shown on each line for the provider. It is a good place to enter a description (e.g. XD) or the actual phone number of the line.
SIP Server
Most of the settings in this section will be specific to the SIP gateway/provider.
- Registrar/Proxy - The IP address and port of the gateway/provider.
- User @ domain - The user name and domain name required for authentication to connect to the gateway/provider.
- Auth id - (Optional) If the auth id is different to the user name for the provider/gateway specify it here.
- Password - If a password is required by the gateway/provider enter it here.
- Registration - tick register if the gateway/provider supports registration, and specify an interval that registration should occur.
- Allow direct calls - if ticked, calls to alternate SIP domains will be made directly from Solo, not via the gateway.
- Local IP address - leave set to '(auto)' except for advanced IP configurations involving firewalls and port forwarding.
NAT/Firewall
- STUN Server - Set the address of a STUN server, if known. STUN allows discovery of paths through NAT firewalls. Not usually required - set this value only if inbound calls or their audio is not received when using a SIP provider on the Internet. STUN should only be used a a last resort method of negotiating NAT and in most cases in not required.
- Use 'RPort' flag - Setting RPort helps audio get through firewalls and should normally be left checked.
- 'Keep alive' interval - To keep NAT translation active a keep alive can be sent on a regular basis.
Audio
- Max jitter (ms) - The maximum jitter controls the variation in interval of audio packets received over IP. If the jitter is too small glitches in audio may be heard. If the jitter is set too high, the latency of the call will be excessive.
Number rules
- Dial prefix - a number to insert in front of any dialled number, e.g. 9 for an outside line. This would then not need to be included in any dialled number within Solo. The minimum digits controls when the prefix will be applied. E.g. numbers with less than 5 digits are internal calls - don't apply the 9.
- Strip prefix - a number to strip from the front of received calls. If a gateway/provider is prefixing calls with an unrequired digit specify it here to remove it. The minimum digits controls when the prefix will be applied.
- Strip characters - any characters specified here will be removed from any number (dialled or received). E.g. enter ',-' to have commas and dashes removed from numbers if caller id is presenting numbers which contain these characters.
- Strip local area code when dialling - if the provider cannot dial local numbers when the local area code is included in the dialled number, select this option to remove the area code before passing it to the provider.