Page History: Using PhoneBOX NX
Compare Page Revisions
Page Revision: Friday, 07 October 2011 16:49
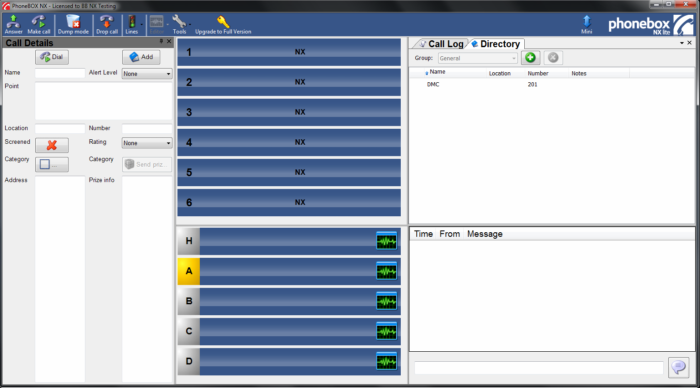
The Default Screen Layout
Shown below is the default screen layout for XScreen.
The default appearance of each installation will vary slightly, depending on the number of lines and devices available. Note that it is possible to customise the layout by resizing and repositioning the various widgets). Screen customisation is described later in this manual. Additionally it is possible to undock each element of the screen (Lines, Devices, Phonebook, Call details & Chat) to create and save your own screen layout.
XScreen's Windows
The Telephony Toolbar
XScreen's toolbar is positioned across the top of the screen and includes basic controls as well as access to system menus.
Lines
Shown at the top left are the NX/iQ6 telephone lines.
Devices
Devices in XScreen include the Desktop Director handset (unless you have selected a talent position) and the hybrids, which are each represented with a letter.
The yellow highlight (on device A above) indicates that this is currently the "active" device. In simple terms this means that any dialling or routing actions carried out will occur on the this device. The active device can be changed by simply clicking on an alternative. The yellow highlight will move to confirm the change.
Call Log
The call log window shows a history of all calls that have been made or been received by Solo.
Directory
XScreen's directory is accessed from this window. Clicking on the green plus symbol allows numbers to be added and these can be allocated within named groups.
Call Details
The call details window allows you to enter details specific to each call. These can then be retrieved later by double clicking the call in the call log window. Relevant details such as name, location etc. are also retrieved should the caller call again.
Chat (Visual Talkback)
Users can have a textual conversation with each other via the chat window. It is possible to setup a chat name for each machine.
Clock
This window shows the time of day and the date. It can also optionally show a countdown to a specific time, which can be set in the following ways.
- Right click in the clock window and select
Countdown... and typing the time to count down to.
- Type @HH:MM:SS into the chat window
To clear the countdown.
- Right click the clock window and click
Clear countdown - Type @xx into the chat window
Customising the Screen Layout
XScreen's screen layout is fully customisable, in that every window can be moved to a different position, resized, docked to a position on the screen or moved to a floating window. It is also possible to combine several windows into one, at which point Solo will provide tabs to select which one is active.
In order to change the layout, each window can be dragged around the screen to where you wish to place it. A series of symbols will appear, as explained below, to show where the window will end up. If the window needs to be undocked first, this can be achieved by clicking "Tools - Undock/Show Window" and selecting the relevant window.
As an example, in the image below the Call Details window is in the process of being dragged out of the top right hand side of the screen.
Various buttons have appeared and the window can be dragged onto one of them in order to determine how it will be placed.
Firstly, there are four main buttons at the top, left, right and bottom of the screen. If the window is dropped onto any of these buttons, Solo will create a new section at that position and dock the window into it. In the image below, the Call Details window has been dragged onto the left hand button.
 |
Secondly, there is an array of five buttons that has appeared within the section that the window is being dragged into. In this example, that section is the top right hand side of the screen. If the window is dragged into the centre button, this will add the window to the current group. In other words, Call Details will be added (back where it was previously) as a tab along with the Call Log and Directory that are already there. If, on the other hand, the window is released into one of the other four buttons, Solo will create a new section within the section being dragged into and dock the Call Details window there. For example, in the image below the Call Details window has been dragged onto the bottom button of the five.
It is also possible to resize windows by dragging dividing lines into new positions (see example below).
Minimizing the screen
Whilst XScreen is running you have the ability to minimize the screen to a docked tool bar, allowing you to use the same computer to say, browse the internet, whilst still answering and routing calls. This is done by clicking the
Mini button on the toolbar. The following image shows the docked tool bar.
To return to full screen mode, click the
Full button.